

Note: this article was adapted from my book handobook for Mechatronics.
Figure 1 shows some practical circuit suitable for the power and control of SMAs.
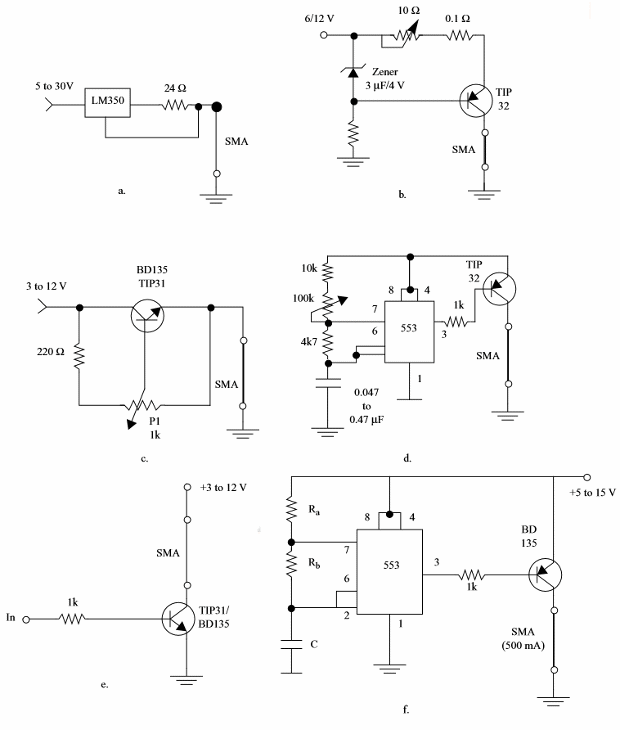
Lets explain the operation and use of each circuit:
(a) Simplest constant current source with values calculated for a 200 mA SMA
(b) Constant Current source using a transistor. This circuit can control SAMs up to 500 mA
(c) Voltage source that can be adjusted by P1. The voltage can be adjusted according the current needed to drive the SMA. Not so good as a current source.
(d) Pulsed Source (PWM) - the medium current through the SMA can be adjusted by the duty cycle of the voltage in the output. Less sensitive to voltage changes in the power supply.
(e) Controlled SMA - this circuit can be turned on and off by a positive voltage applied to the base of Q1. This transistor must be mounted on a heatsink.
(f) Timed circuit - this circuit turns on and off a SMA in time intervals determinated by Ra, Rb and C acording the next formulas:
Formulas
Time on: T = 1,1 x Ra x C
Time off: T = 1,1 x (Ra + Rb) x C
(g) Another timed circuit with monostable action driving the SMA when a negative pulse is applied to the input. The time the output remains on is given by:
Formula
T = 1,1 x R x C
(h) The same circuit as shown in (f) but when the needed time on must be larger than the time off.
Discovering the Characteristics of a SMA
If you have a determinated length of SMA wire but you don't know its characteristics it is easy to discover them using the circuit arranjement given in figure 2.
The power supply must be rated to 2 A at least or more acoording the tested SMA.

If you have only multimeter you can first place it as (A) and when finding the transition voltage placing it as (B) to find the current.
Procedure:
a) Adjust the output of the power (P1) supply for 0 V.
b) Them, open slowly P1 to increase the ouput voltage and observe at the same time the SMA.
c) When the transition current is reached the SMA will change its shape moving the test arm.
d) Increase a little bit more the voltage (not more than 10% above the previous value). Read the voltage in (A)
e) Read the current in (B).
f) With these values you can determine:
The resistance of the SMA:
R = V(a)/I(b)
Where: R is the resistance of the SMA in ohms
V(a) is the voltage read in (A)
I(b) is the current read in (b)
The current to drive the SMA: I(b)
The resistivity of the SMA:
Formula
ρ = R/L
Where:
ρ is the resistivity in ohms/cm
R is the resistance in ohms
L is the length in centimeters
More Practical Information For the Use
Table - Minimum Bend Radius
If a SMA wire is sharp bended the risk of damage occurs. The next table gives the minumum recommended bend radios accoding de wire diameter.
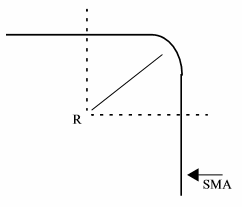
| Wire Diammeter (um) | Minumum bend Radius (mm) |
| 25 | 1.25 |
| 37 | 1.85 |
| 50 | 2.50 |
| 75 | 3.75 |
| 100 | 5.00 |
| 125 | 6.25 |
| 150 | 7.50 |
| 200 | 10,0 |
| 250 | 12.5 |
| 300 | 15.0 |
| 375 | 16.7 |
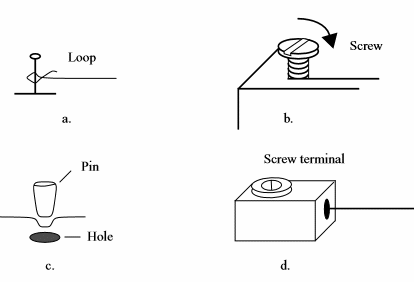
Connection Methods
To avoid contact problems when using the SMA wires is important to use some of the connection methods: shown by figure 4.
Bias Force Mechanisms
Figure 5 shows some ways to create bias force against SMA wires.
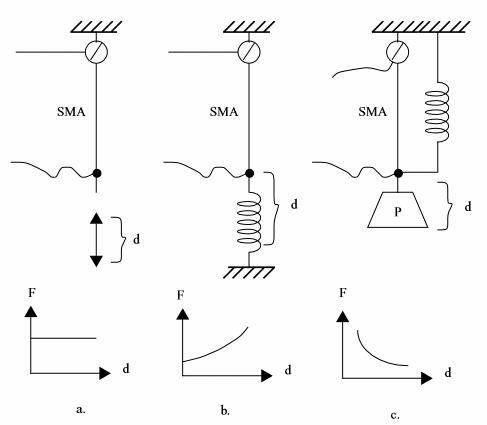
(a) The force is constant along the distance A-B.
(b) The force increases with the distance A-B.
(c) The force decreases with the distance


