An electroscope is an instrument that can be used for detecting the presence of an electric static charge.
We describe here an electronic version of the traditional electroscope-one that is made with gold foils placed into a glass jar.
This circuit can also be used for “sniffing” high voltage without actually making contact with dangerous circuitry.
A metal ring, which constitutes the sensor, is simply poked into the electric field.
This operation must be done with caution to avoid contact with the conductors carrying the high voltage.
You can use the device in experiments with high voltage generators (Van de Graaf accelerator) and in many other applications at home or school.
The circuit is portable, powered from four AA cells or a 9V battery.
Presence of a static charge or a strong field created by high-voltage lines is indicated by an LED.
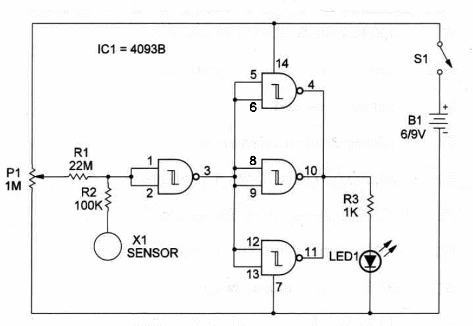
The schematic diagram of the Electroscope is shown in Figure 1.

The circuit uses four gates of a 4093 IC that work as buffers and inverters, driving the LED.
The high-impedance input of the CMOS integrated circuits results in high sensivity to detect static charges.
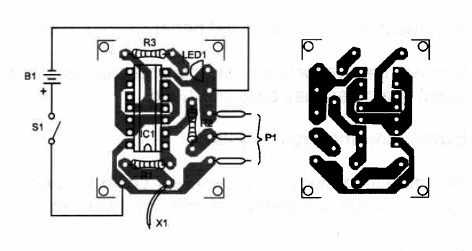
All the components are mounted on a homemade printed-circuit board as shown in Figure 2.

Sensor X1 is a small bare wire loop. The completed circuit can be housed into a small plastic box with the batteries.
The LED should be placed in a visible point of the box.
To use:
Bring a charged source close to the sensor. A piece of paper or plastic stroked with a rod of insulating material will do.
Adjust P1 to get better sensitivity. The LED will glow according to the electric charge movement.
LISTA E MATERIAIS
Electroscope
IC1 - 4093B CMOS Integrated Circuit
LED - Common red, yellow or green LED
X1 - Sensor - see text
P1 - 1,000,000 ohm potentiometer
R1 - 22,000,000 ohm, ¼ W, 5% resistor
R2 - 100,000 Ω, ¼ W, 5% resistor
R3 - 1,000 Ω, ¼ W, 5% resistor
S1 - SPST slide or toggle switch
B1 – 6 V or 9 V - four AA cells or 9V battery
Ideas to Explore
To learn more about the circuit or to get better performance:
Connect the sensor to an external antenna. You can detect clouds electrical charge as they pass overhead.
Explain how the circuit works.
An interesting study or experiment could be performed to show how static charges are produced and how they can be detected.
Science and uncommon applications:
In all the experiments that can be conducted with a common electroscope. the electronic version can replace it.
Determine the polarity of the charge that makes the LED to glow.
Static charges could have some influence on animals and plants.An experiment to support this affirmation can be conducted. This project, of course, will involve some special equipment such as a high-voltage generator (Van de Graaff or other) and an electroscope. Select seeds from common plants such as tomatoes and beans, and expose several batches of seeds to a static high-voltage field. What are the effects on seed germination? ls plant growth also affected by electric fields?


