If you’re interested in doing some servicing on your audio equipment (multimedia, for instance) you will undoubtedly find this square wave generator to be a handy tool.
You can also use this circuit in RF stages in AM/FM receivers, since the oscillator harmonics are strong in frequencies as high as 100 MHz.
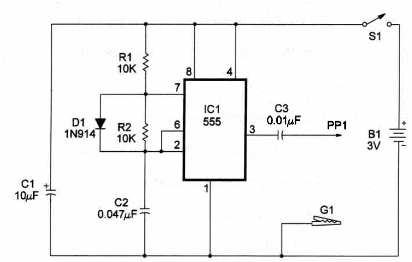
In this arrangment, frequency is determined by capacitor C2, resistors R1 and R2, and D1.
The frequency can be altered by the values of resistors and/or capacitors selected. In our circuit the oscillator runs at about 1,000 Hz.
The output signal waveform is square and the output swings the full power supply voltage, which can be anything between 3 and 12 volts (we recommend a 3-volt power supply if you want a portable unit).
Supply current is typicaly 10 µA, extending battery life.
Figure 1 shows the complete schematic diagram of the Signal Injector.

IC1 is a 555 timer, wired as an audio oscillator. Frequency is determined by C2, R2 and R1 .You can change 02 within a large range of values.
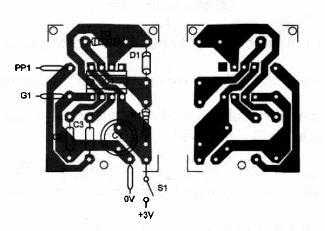
Figure 2 shows the homemade PC board where the components are mounted.

A small 3 V battery can also be used if you want a very compact mounting.
A signal injector is used from the “back” to the “front” of an audio (or RF) circuit.
For instance, to use the signal injector with an AM receiver, apply the signal from the probe at the base of the output transistor.
If that stage and everything after it operates correctly the signal will be heard in the speaker.
If the output stage proves to be OK, move back to the base of the driver transistor. The output signal will be higher if everything is working.Then, apply the signal progressively towards the front of the circuit by injecting it at the volume control, detector stage, IF stages and the mixer.
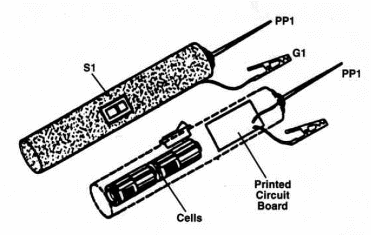
The circuit can be housed in a small plastic box and connected to the external circuit through a probe and an alligator clip. Figure 3 represents a possible housing arrangement.

To test the signal injector, apply the signal to the input of any audio amplifier.
Signal Injector
IC1 - TLC7555 CMOS integrated circuit - timer
D1 - 1N4148 or 1N914 general-purpose silicon diode
R1, 2 - 10,000 ohm, ¼ W, 5% resistor
C1 - 10 µF, 6 WVDC electrolytic capacitor
C2 - 0.047 to 0.1 µF ceramic or metal film capacitor
C3 - 0.01 µF ceramic or metal film capacitor
S1 - SPST toggle or slide switch
B1 - 3V - two AA cells
PP1 - Probe
G1 - Alligator clip
Ideas to Explore
To learn more about the circuit or to get better performance:
What happens with the wave shape if D1 is removed?
Why can the circuit be used in frequencies as high as 100 MHz if it generates a 1,000 Hz signal?
Replace the IC with a common 555 (bipolar). The circuit will work, but the current drain is higher than in the original version.
Remove C3 and power the circuit from a 5V power supply. The signal injector can now be used in TTL logic circuits.
R1 and R2 are shown as fixed resistors in this project. You can change these resistors to a potentiometer (1,000,000 Ω, for instance) in series with a 1,000 ohm resistor to generate signals within a large range of frequencies and duty-cycles.
Science projects using the signal injector:
The circuit can be used as a simple bio-stimulator in biological experiments. Stimulation levels as high as the power supply voltage can be achieved. These levels can be used in direct nerve stimulation.
Wire a piezoelectric transducer or crystal earphone to the output of this signal injector. A tone of about 1,000 Hz will be produced and can be used in experiments.


