One of the limitations of the combat robot, which is our robot that carries a balloon and has needles that should blow the opponent's balloon, is the type of control used, as shown in Figure 1.
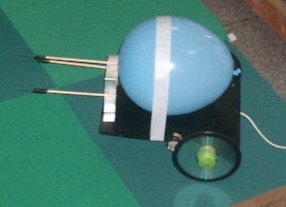
Two switches are used that drive the motors in both directions, directly.
Thus, the robot does not have a smooth operation, with the motors running at full speed forward and backward which makes its control difficult in some moments and also abrupt.
The idea behind this project is to use an anti-phase PWM control, which we have already described in our website articles (ART046E and ART047E), which allows the dosing of a motor, both forward and backward.
Controlling the two motors with potentiometers, we have more quickness and, therefore, it is more precise in the accomplishment of the movements.
We can place the two potentiometers horizontally in a box with the buttons activated as shown in Figure 2.
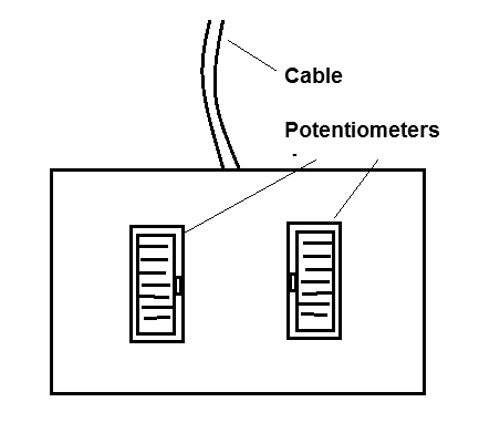
With the centralized potentiometers the motors are stopped.
By advancing or retracting any of the potentiometers, the corresponding motor advances or reverses its rotation with complete control.
Of course, this type of control has some types of disadvantages over a common control, although the main advantage is in its simplicity.
A disadvantage is the need to have a symmetrical power supply, which in the case of the batteries it means at least 8 cells if the motors are 6 V.
The second disadvantage lies in the fact that even when stopped the motor has a high current consumption, which in the case of batteries decreases its autonomy.
How it works
The base of the circuit is an anti-phase PWM control, which works as follows:
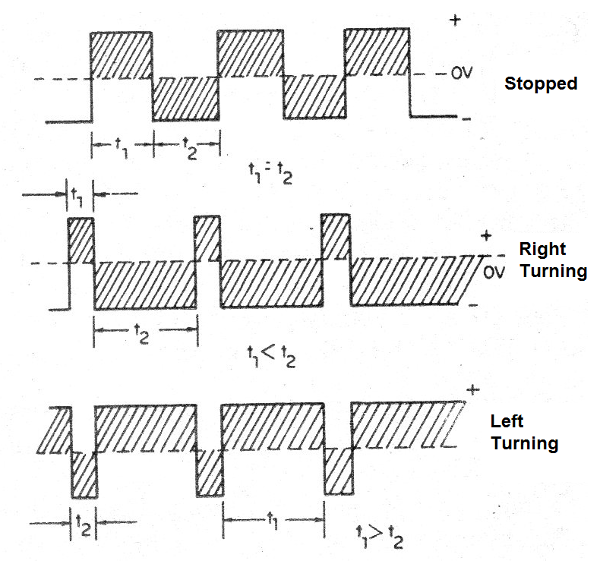
In this type of control the signal applied to the motor oscillates between the positive and the negative, as shown in Figure 3.

Thus, we have positive pulses and negative pulses applied to the motor alternately at a frequency ranging from a few hertz to thousands of hertz depending on the type of motor to be controlled and its power.
If the pulse width is equal to the spacing, i.e., if the positive pulses have the same duration as the negative pulses, the average voltage applied to the motor is zero and it remains stationary.
In practice, it will only oscillate at the frequency of the applied signal. However, if we increase the duration of the positive pulses while decreasing the duration of the negative pulses, we have the predominance of positive voltages applied in the motor and it starts to rotate in the direction that these pulses determine, as shown in Figure 4.

The greater the width of the positive pulses in relation to the negative ones, the greater the average positive voltage in the motor and the greater its speed in the direction that it determines.
Similarly, if the width of the negative pulses is greater than the one of the positive pulses, the negative voltage prevails in the average applied to the motor and it starts to rotate in the opposite direction.
The greater the width of the negative pulses in relation to the positive pulses, the greater the speed of the motor in this direction.
Figure 5 gives an idea of ??what happens.
Although this type of circuit has the advantage of allowing speed control of a DC motor in both directions, it has a disadvantage: when the motor is stopped it receives practically the maximum power, thus continuing to dissipate energy converting it into heat.
Note that the current continues to circulate at maximum intensity in both directions even when the engine is stopped!
In the same way, regardless of the speed of the motor in one direction or the other, the applied power remains constant because on average the widths of the two pulses added are maintained.
Due to these characteristics, this type of control is only applied in the control of very low power motors, where there are no problems of heat dissipation either by the motor or by the control circuit itself.
To produce the pulses in the desired widths to control the engine we use a 555 asphalt in an adapted configuration.
This configuration has two diodes that determine the charge time of the capacitor and, therefore, the high output level and the discharge time, which determines the low level, as shown in Figure 6.
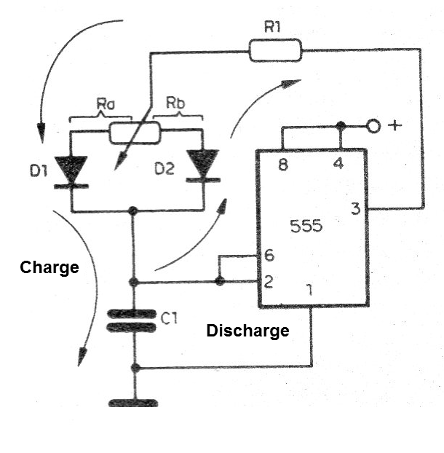
With the potentiometer in the central position the charging time is equal to the discharge time and the power applied to the motor is zero.
To one side or the other, the potentiometer changes the times and thus the pulses change in duration causing the motor to rotate in another direction.
The greater the difference between the durations of the pulses in the desired directions, the greater the speed in the corresponding direction.
A critical component of this circuit is the capacitor C1.
This component must be chosen so that the engine does not vibrate too much depending on its characteristics.
The 555 output is applied to two complementary power transistors so that, with the positive pulses conducting one and with the negative pulses conducting the other.
The transistors used allow several possibilities.
For currents up to 500 mA, we can use the pair BD135 and BD136. For larger currents we can use Darlingtons like the TIP110, TIP11, TIP112, TIUP120, TIP121, TIP122, etc.
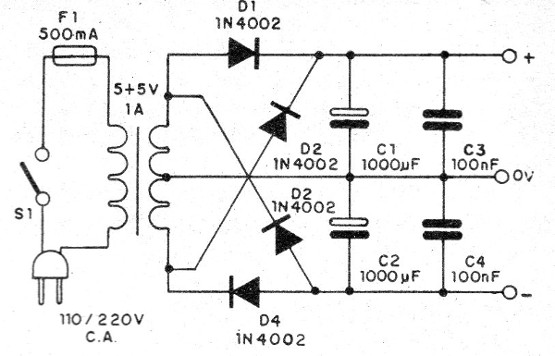
Note that to power the circuit we need a symmetrical source that can be obtained with two sets of batteries with voltage according to the motors used.
We can also use a power supply connected to the power grid, however, it takes away some mobility from the operator.
In Figure 7 we give the diagram of this power supply.
The complete control circuit for a motor is shown in Figure 8.
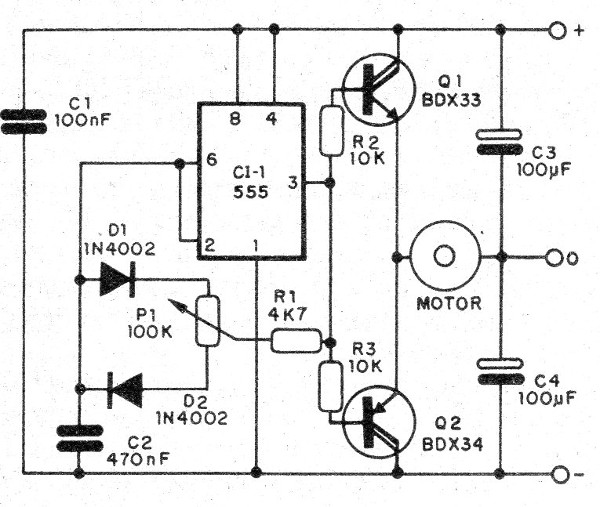
Of course, for two motors, two control circuits as shown must be mounted.
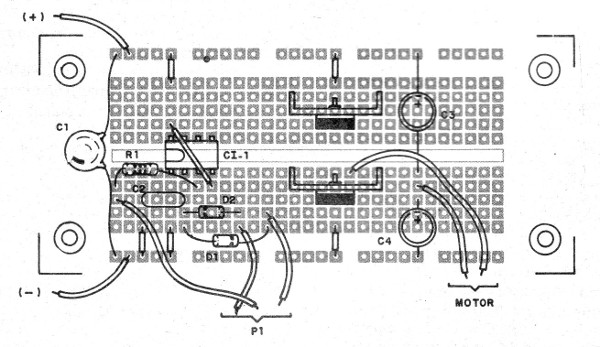
Assembly can either be done on your own printed circuit board or on a universal board or contact array.
In Figure 9 we have the standard for a universal board with array of contacts.
A stabilized power supply is shown in Figure 10.
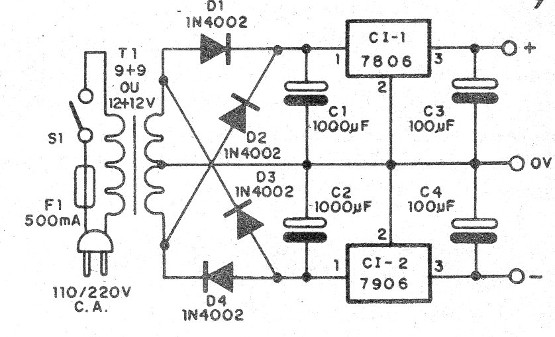
This power source can be assembled using a terminal strip as shown in Figure 11.
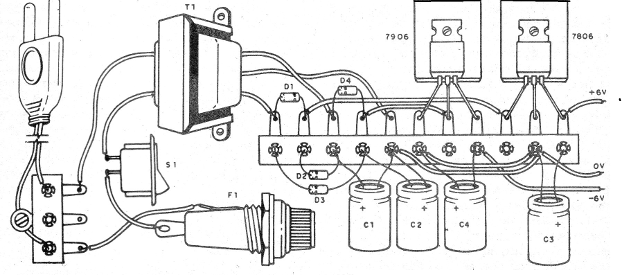
To test the circuit, simply feed it and check if the motor rotates in the directions adjusted by the potentiometer positions.
If the motor tends to vibrate and does not rotate, change the value of capacitor C2.
In the final robot, if powered by batteries, use medium or large batteries, given the larger current of the motors.
Rechargeable batteries are the ideal solution, given their possibility to use many times.
If you use the pair DB135, BD136 exchange R2 and R3 for 1k ohm x 1/8 W.
CI-1 - 555 - An integrated circuit
Q1 - A BDX23 or NPN of the TIP Darlington series
Q2 - A BDX24 or PNP from the TIP Darlington series
D1, D2 - 1N4002 - Silicon diodes
P1 - 100k ohm - A potentiometer
R1 - 4k7 x 1/8 W - A resistor - yellow, violet, red
R2, R3 - 10k ohm x 1/8 W - Resistors - brown, black, orange
C1 - 100 nF - A polyester capacitor
C2 - 470 nF - A ceramic or polyester capacitor - see text
C3, C4 - 100 uF x 12 V - Electrolytic capacitors
M – Motor - see text
Miscellaneous:
A printed circuit board, wires, a welder, a battery holder, etc.


